This procedure is basically a standard abdominoplasty with the addition of recontouring of the hips, flanks and even the lateral thigh. If the flanks have excess subcutaneous fat but not significant excess skin, liposuction of the flanks is performed at the time of standard abdominoplasty.
When is an Extended Abdominoplasty needed?
Sometimes, there is significant excess skin of the hips extending onto the flanks, with ptosis (sagging) of the lateral (outer) thighs. This is usually the case after significant weight loss; I rarely perform this procedure in other patients. In this case, a standard abdominoplasty will not address the skin excess over the hips. While a standard abdominoplasty will re-contour the central ninety percent or so of the abdomen, in these patients there will actually be an accentuation of the excess skin on the sides when the abdominal skin is advanced downward, creating a deformity which the lay public have termed a “muffin top”. This bulging of excess skin is not the same as a “dog ear”. A dog ear (how it got that name I don’t know) is when there is a small 1 – 2 cm pucker of skin at the ends of the incision. This can be re-contoured at surgery, or if it is recognized or develops later on (fairly common), it can be easily trimmed under local anesthesia in a few minutes as a minor office procedure.
The problem with the muffin top is that this is not something that can be fixed under local anesthesia in a few minutes. It is much better to recognize the potential for this problem during the planning stages for surgery so that the correct procedure is chosen. The treatment is simple…to surgically remove the excess skin. The problem is that if you try to treat it like a dog ear, with the patient lying flat on the operating table you will end up inadequately treating it and re-directing the ends of the scar upwards and above the clothing line, just what you don’t want to happen!
What to expect during an Extended Abdominoplasty
The best way to handle this is to plan for an extended abdominoplasty. When the patient is being marked for an extended abdominoplasty in the standing position, markings are placed so as to remove this excess hip/flank skin but to keep the scar low, under the waistband of the clothing. During surgery, a standard abdominoplasty is performed in the usual manner, and the wound is dressed. Next, the patient is turned onto one side, exposing the entire hip/flank area. The excess skin is excised, the wound is closed and dressed. Next the patient is turned to the opposite side and the same procedure is repeated there as well.
The Steps in Performing an Extended Abdominoplasty
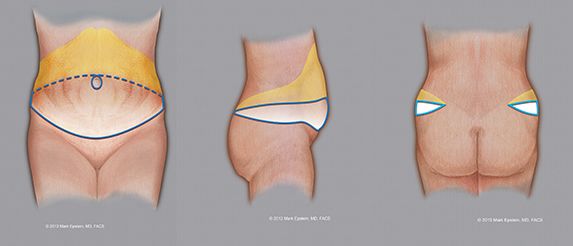
Step 1
Click to Enlarge
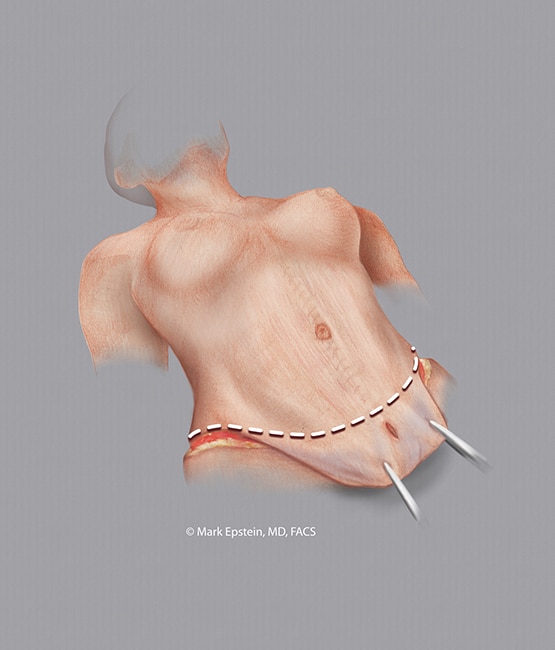
The blue ellipse indicates the proposed amount of skin to be removed. The lower solid blue line is where the initial incision is made. The dotted blue line is the proposed upper portion of the skin excision (removal). This can vary upwards or downwards depending upon how much skin excess exists. The blue circle around the navel (umbilicus) represents the incision around the umbilicus. The umbilicus remains attached to the underlying abdominal muscles and is not lifted upwards with the remaining abdominal skin. This leaves a circular hole in the skin flap (see Step 5). The yellow area shows the extent to which the abdominal skin is elevated off the abdominal wall. The incision ultimately extends to the posterior flanks, how far back on the flank depends upon how much extra skin needs to be removed. This procedure is performed with the patient first on their back, then after the front has been completed, the patient is turned on their right side, then onto the left side.
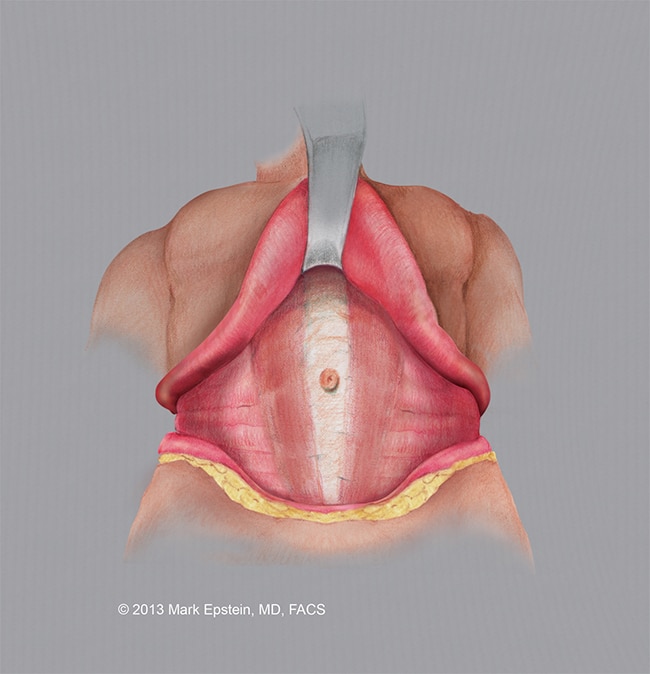
Step 2
The abdominal skin is elevated off the abdominal wall, the abdominal musculature is revealed. Note, the umbilicus remains attached to the muscle in the midline. The area of surgical dissection extends to the flanks, further than during a standard abdominoplasty.
Click to Enlarge
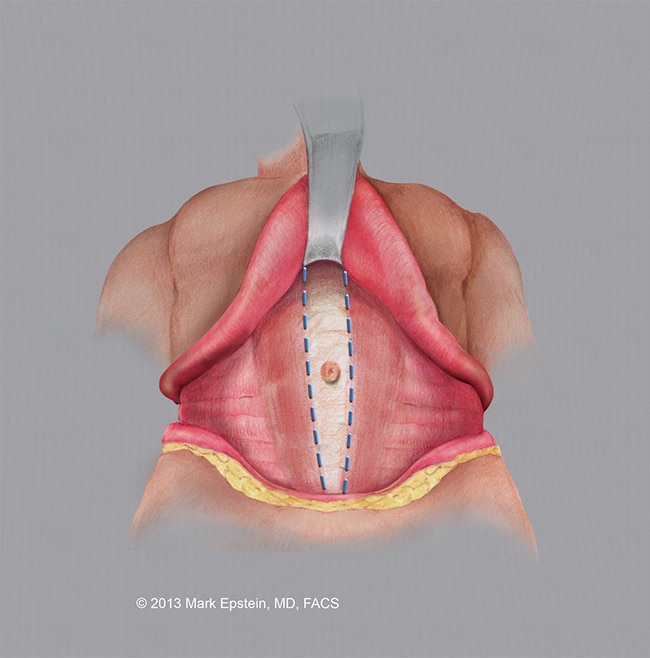
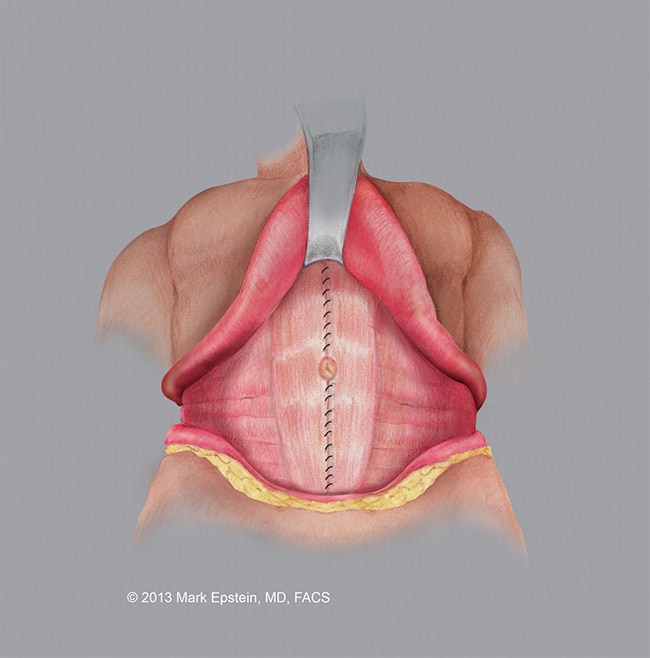
Step 3
The abdominal wall musculature is tightened using a special running suture. The muscles are brought together in the midline.
Click to Enlarge
Step 4
The completed repair of the abdominal musculature is shown.
Click to Enlarge
Step 5
The excess skin is elevated above the abdominal wall and pulled downward. The area of resection (removal) is indicated with a dotted line. The original hole in the abdominal skin is below the line of resection (removal of skin) and therefore is removed with the abdominal skin.
Click to Enlarge
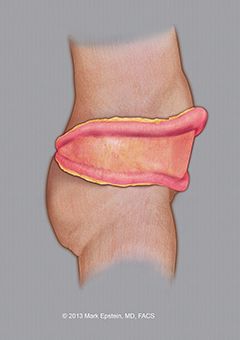
Step 6
The flank wound exposed. The skin is elevated above and below, the excess is trimmed and then the wound is closed. There is no need to tighten the musculature. This portion of the procedure is usually performed after the front of the abdomen has been completed and the wound closed. The patient is turned onto one side, then the procedure is repeated on the other side. This is because it is often impossible to access the posterior flank when the patient is lying supine (on their back).
Click to Enlarge
Step 7
Click to Enlarge

Click to Enlarge
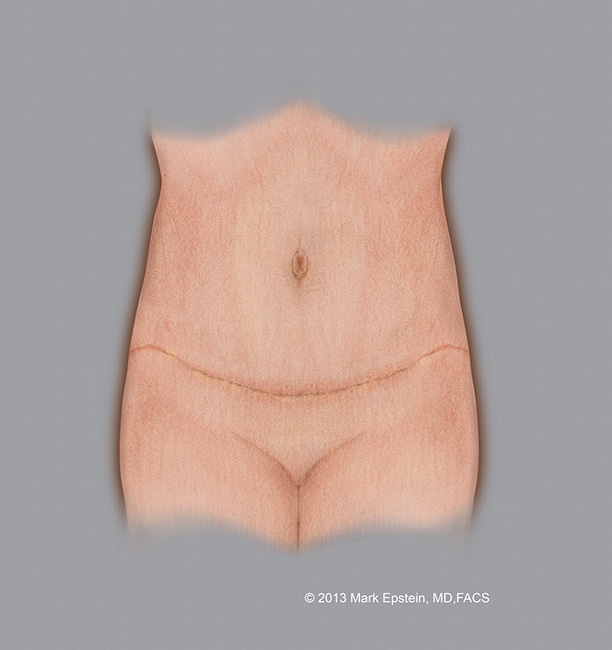
The final result of the front portion of the procedure is shown on the left with the location of the scar across the waist crease of the abdomen as well as a scar around the umbilicus. After this portion is completed, the wound is dressed and the patient is turned onto their right side for excision of excess flank skin. Lastly the procedure is repeated on the left side. The posterior view of the final closure is shown on the right.
Sections - Abdominoplasty Types
- Why Do We Need Different Types Of Abdominoplasty?
- Standard Abdominoplasty With “Umbilical Re-Positioning”
- Standard Abdominoplasty with a “Floated Umbilicus”
- Mini-Abdominoplasty
- Extended Abdominoplasty
- Circumferential Abdominoplasty “Belt-lipectomy”
- Flowchart – How to Select an Abdominoplasty Procedure
Prev Chapter: How is an Abdominoplasty Performed? »
Next Chapter: Combination VASER/PAL HI-Definition Lipo-Abdominoplasty »