
This is an alternative procedure which is selected less frequently than a standard abdominoplasty with umbilical re-positioning, which was previously described. The indication for this procedure, in my opinion, is fairly limited, but when indicated, it gives excellent, natural results.
I restrict this procedure to the case where a patient has very little, if any, excess skin ABOVE the umbilicus. In such a patient, if you perform a standard abdominoplasty with umbilical re-positioning, then when pulling the abdominal skin flap towards the feet, the hole created around the umbilicus will not move very far below the original site of the umbilicus, ultimately requiring a vertical scar on the mid-lower abdomen. To understand this, you need to first understand how a standard abdominoplasty with umbilical re-positioning is performed. The below diagram details the results when you apply a standard abdominoplasty with umbilical re-positioning to a patient with very little upper abdominal laxity:

Figure 1 – Click to Enlarge
Left: Patient with mostly lower abdominal skin excess, the upper abdomen has little excess. Middle: Advancing the skin flap downward and removing the excess skin. The hole will lie somewhere between the umbilicus and the waist crease incision and may be visible above the waistband of clothing or a bathing suit. Right: The final result is shown. The excess skin has been removed, a new hole was created on the abdominal skin flap and the umbilicus (which remained attached to the abdominal muscles below) is now brought out through that hole and sutured to that hole. The previous umbilical hole is now closed as a small vertical incision which now lies midway between the umbilicus the waist crease incision. Note the scar across the waist crease of the abdomen with the small vertical scar on the mid-lower abdomen and the scar around the umbilicus. In these cases, sometimes a better choice is to “float the umbiliicus” which avoids both scar around the umbilicus and the vertical incision on the lower abdomen altogether. The tradeoff is a slightly lower umbiliicus, one without any scar around it, but this usually does not detract from the overall result of the procedure. Generally, the umbilicus will look natural as long as it is not lowered more than about 2 cm.
So here is the rationale for floating the umbilicus: We know that the problem with a standard abdominoplasty with umbilical re-positioning in a patient with little skin excess above the umbilicus to start with is that the hole created around the umbilicus will unfortunately not move very far down from its original location. So, let’s put that to our advantage. Now, lets say, OK, since the hole won’t move very far down, then let’s not create an incision around the umbilicus and therefore let’s not leave the umbilicus behind on the abdominal wall to re-position later (the very maneuver that creates the umbilical hole in the first place). So now, the umbilicus remains completely intact, with no scar around it (the very telltale sign of an abdominoplasty if you wear a bikini or expose your midsection) continuous with the abdominal skin flap. So, in other words, we make the incision at the waist crease, elevate the abdominal skin as we move upwards towards the chest. Then, when we encounter the attachment of the umbilicus to the abdominal wall, we detach the underside of the umbilicus from the abdominal wall and continue to elevate the abdominal skin flap up to the chest. This way, when you pull the abdominal skin flap towards the feet to get rid of the excess skin, the actual position of the umbilicus will move below its original location. However, if this new lower position is only a little lower, the overall appearance of the abdomen will be quite good, the slightly lower position of the umbilicus will probably not be noticeable and there is no tell tale scar around the umbilicus!
The beauty of a “mini-abdominoplasty” is that there is no scar around the umbilicus. The same holds true here. The difference is that the indication for a “mini-abdominoplasty” is when there is no excess skin above the umbilicus AND the abdominal muscles are not lax in the upper abdomen. With a “mini-abdominoplasty”, neither excess upper abdominal skin nor muscle weakness can be addressed. However, with a standard abdominoplasty with an umbilical float, both problems can be addressed. A word of caution: if you underestimate the degree of excess upper abdominal skin, then the umbilicus will end up a lot lower on the abdomen then you want and you will need to accept some upper abdominal skin excess by re-attaching the umbilicus higher than it would naturally lie with the abdominal skin flap pulled down at proper stretch.
There are other alternatives here. You can perform a standard abdominoplasty with umbilcal re-positioning and make the waist crease incision a lot higher and then there will be no vertical scar. Of course, the waist crease incision will now span across the lower abdomen considerably higher than the waistline of your clothing. Or, you can sit the patient up to permit the removal of more skin so as to encompass the hole around the umbilicus and close the wound with the patient in the sitting position. This will place the wound under a great deal of tension, increasing the risk of wound separation, loss of lower abdominal skin and significant wound healing complications and a few weeks until the patient can stand upright, not to mention a flat, shapeless abdomen. Well, I didn’t say that these were good options, did I???
The Steps In Performing A Standard Abdominoplasty With Floating The Umbilicus
Step 1
Click to Enlarge
Click to Enlarge
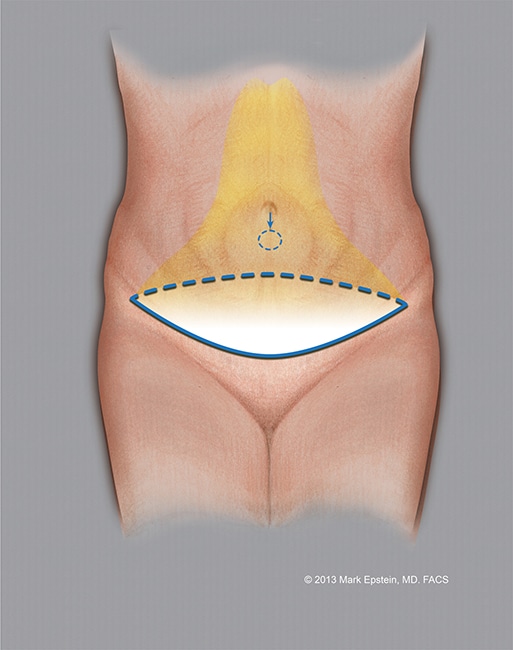
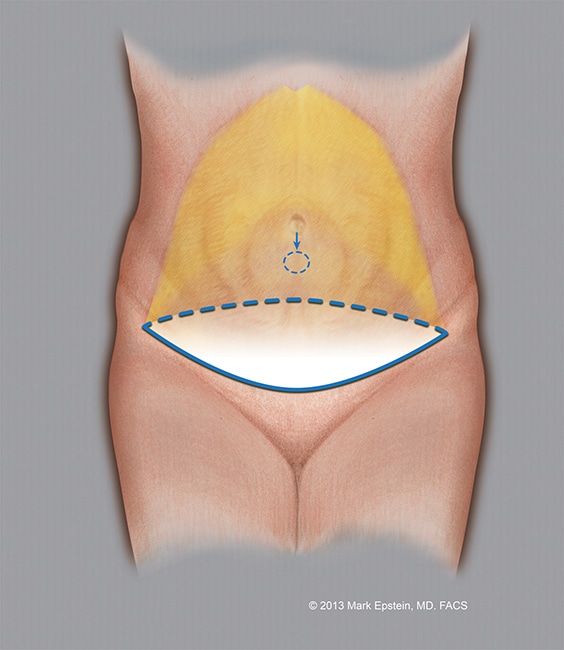
The blue ellipse indicates the proposed amount of skin to be removed. The lower solid blue line is where the initial incision is made. The dotted blue line is the proposed upper portion of the skin excision (removal). This can vary upwards or downwards depending upon how much skin excess exists. In this procedure, there is no incision made around the umbilicus. The umbilicus remains undisturbed and remains attached to the abdominal skin. This is why there will not be a circular hole in the skin flap. The yellow area shows the extent to which the abdominal skin is elevated off the abdominal wall going upwards to the chest. As the umbilicus is encountered during the skin elevation, it is simply detached from the underlying abdominal muscles, just as the rest of the abdominal skin is detached. Depending whether or not there is a horizontal excess of skin, the skin can be elevated as a narrow tunnel (left) which preserves more blood supply to the abdominal skin (preferred when possible) or as a wider tunnel (right) when necessary so that the skin can properly re-drape over the muscles during the healing phase.
Step 2
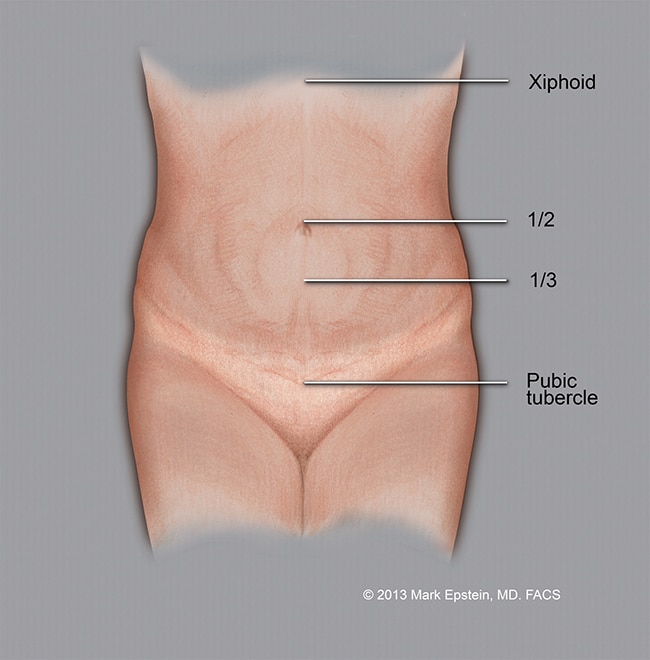
When selecting this procedure, it is critical to be able to estimate about how far the umbilicus will descend as the abdominal skin is pulled downward. It is acceptable for the umbilicus to be a little bit lower than it started. It is essential that there is not too much inferior displacement or the umbilicus will be too low in the pelvis, and this does not look good. Generally, a simple rule of thumb is to divide the abdomen into thirds from the bottom of the Xiphoid process (lower portion of the breastbone) to the pubic tubercle (pubic bone at the lower abdomen). If the umbilicus lies between the halfway point between these two landmarks and the junction of the middle and lower thirds, then the umbilicus should be in an acceptable position. Nothing is a hard and fast rule, but this works in most cases. It is really a judgment call based upon the experience of the surgeon.
Click to Enlarge
Step 3
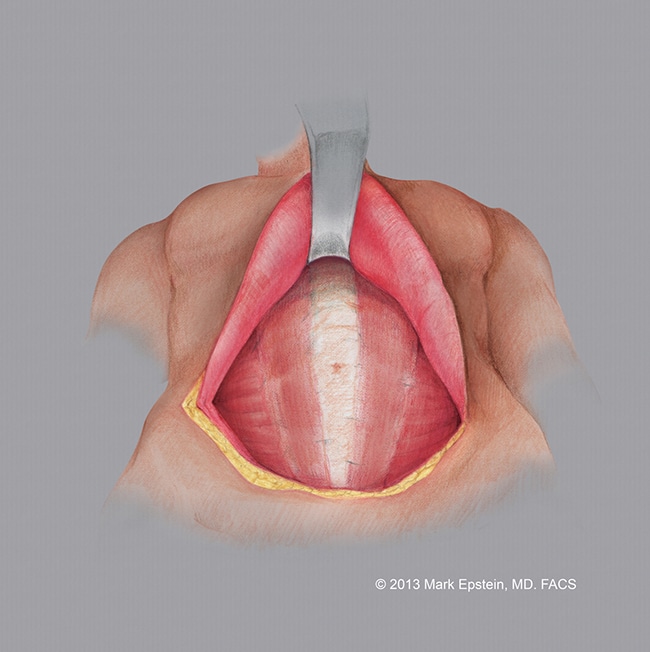
The abdominal skin is elevated off the abdominal wall all the way up to the chest, the abdominal musculature is revealed. The site where the underside of the umbilicus was detached is apparent.
Click to Enlarge
Step 4
The abdominal wall musculature is tightened using a special running suture. The muscles are brought together in the midline.
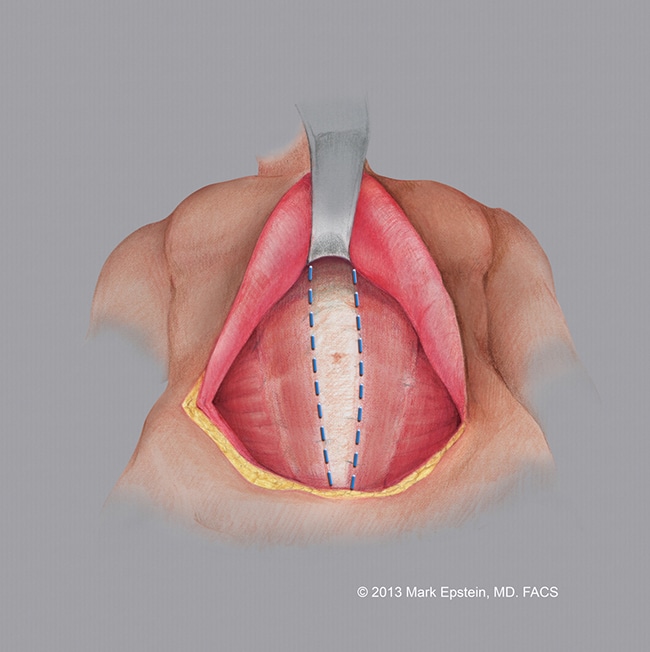
Click to Enlarge
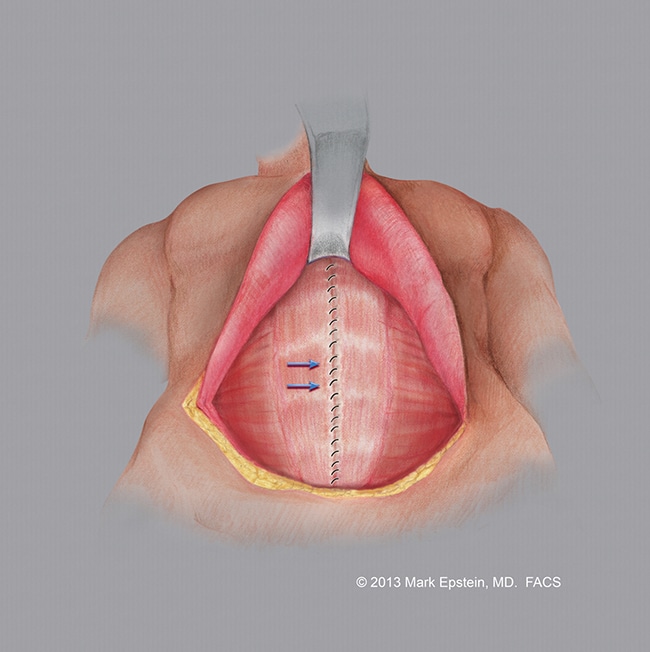
Step 5
The completed repair of the abdominal musculature is shown. Prior to tightening the muscles, the level of the attachment of the umbilicus is marked with a surgical marker (upper arrow) and the new site of attachment, slightly lower, is marked in a similar fashion (lower arrow).
Click to Enlarge
Step 6
The excess skin is elevated above the abdominal wall and pulled downward. Remember the umbilicus remains as part of the abdominal skin flap. The area of resection (removal) is indicated with a dotted line. There is no hole in the abdominal skin flap because there was no incision made around the umbilicus.
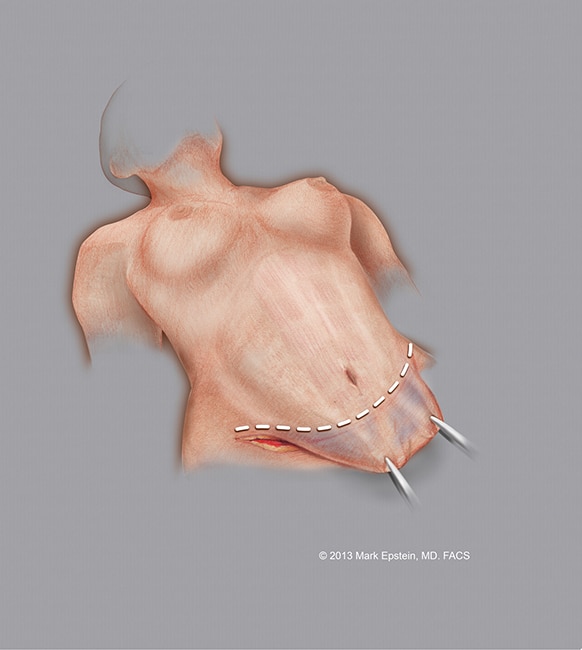
Click to Enlarge
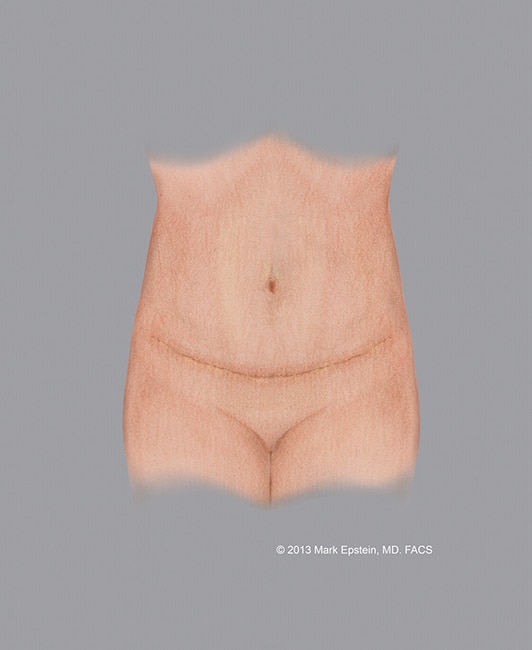
Step 7
The final result is shown with the location of the scar across the waist crease of the abdomen. There is no scar around the umbilicus. The beauty of this procedure, like a mini-abdominoplasty is that the umbilicus remains unaltered, with no scar around it. However, this procedure differs from a mini-abdominoplasty in that a standard abdominoplasty with an umbilical float will address BOTH upper abdominal skin excess as well as muscle laxity, whereas a mini-abdominoplasty will not.
Click to Enlarge
Sections - Abdominoplasty Types
- Why Do We Need Different Types Of Abdominoplasty?
- Standard Abdominoplasty With “Umbilical Re-Positioning”
- Standard Abdominoplasty with a “Floated Umbilicus”
- Mini-Abdominoplasty
- Extended Abdominoplasty
- Circumferential Abdominoplasty “Belt-lipectomy”
- Flowchart – How to Select an Abdominoplasty Procedure
Prev Chapter: How is an Abdominoplasty Performed? »
Next Chapter: Combination VASER/PAL HI-Definition Lipo-Abdominoplasty »
